
Digi-Mod - Surface mount soldering
This is a brief guide to surface mount soldering by hand. It is intended to enable those without any surface mount soldering experience to be able to assemble a 4xD or Digi-Mod PCB.
What you will need
| Soldering iron | One with temperature control is strongly recommended. |
|---|---|
| Fine soldering iron bit (e.g. 1mm) | I use one that's this shape and 1mm across the tip: (this is a good shape for 'drag-soldering' fine pitch ICs) |
| Soldering iron sponge | If you're not already in the habit of working with a clean bit, you'll want to be for this! |
| Good lighting | Kind of obvious, but very helpful. |
| Fine tweezers | For placing small parts. |
| Pointed implement | Useful for pushing small parts into place and holding them there while soldering. I'd recommend something like this cheap Soldering Aid Set which has both a straight and a bent pointed thing. |
| Powerful magnifying glass | For final inspection of solder joints. Personally I use the scanning lens salvaged from an old fax machine, which has a really high magnification. |
| Very fine no-clean solder (28swg/0.38mm or finer) | The "no-clean" is important. An alternative would be to use organic flux and wash thoroughly and immediately after soldering, but no-clean is just easier! |
| No-clean flux gel or a no-clean flux pen | The gel is preferable to the liquid flux that you get in pens as it is a bit tacky and helps to hold the components in place. The gel can be applied with a small screwdriver or a matchstick. |
| Fine no-clean desoldering braid | For removing solder bridges between IC pins. Also note the "no-clean" - some desoldering braids contain rosin flux. |
Construction order
The 4xD and Digi-Mod circuit boards are quite densely packed so you definitely want to solder all the surface mount parts first otherwise the bigger thru-hole parts will get in the way. It doesn't really matter which order you solder the surface mount components, although depending on the shape of your soldering iron bit you may find it easier to solder the ICs before the surrounding capacitors and resistors.
Iron temperature
I tend to work with quite a hot iron temperature (around 375°C) which makes things quicker and is needed for the fine pitch IC soldering technique below to work well. The actual temperature setting will vary from iron to iron, but it'll probably be somewhere between 330°C/626°F and 380°C/716°F (although with some cheap temperature controlled irons the temperature setting may not be very accurate, so try higher if it's not working well). Most modern components are quite resilient, being designed to cope with automated soldering and lead-free solder, but even so when working at these higher temperatures try not to leave the iron in contact for too long.
Soldering 0805 chip resistors and capacitors
- Apply flux to both pads.
- Position the component with tweezers and/or pointed implement.
- Load some solder onto the soldering iron tip.
- While holding the component in place with pointed implement, touch the soldering iron to one end of the component so the solder flows onto the pad and component end.
- Then load some more solder onto the soldering iron tip and repeat with the other end of the component (it won't need holding in place this time).
- Visually inspect with a magnifying glass to check the joints are good and that there are no solder bridges to nearby pads or components.
Soldering SOT-23 transistors
- Apply flux to all 3 pads.
- Position the component with tweezers and/or pointed implement.
- Load some solder onto the soldering iron tip.
- While holding the component in place with pointed implement, touch the soldering iron to the middle pin/pad so the solder flows onto the pad and pin.
- Then repeat the process for the other 2 pins (it won't need holding in place this time).
- Visually inspect with a magnifying glass to check the joints are good and that there are no solder bridges to nearby pads or components.
Soldering medium pitch ICs (i.e. the 1.27mm pitch SRAM ICs)
- Apply flux to all pads.
- Position the component with tweezers and/or pointed implement.
- Load a small amount of solder onto the soldering iron tip.
- While gently holding the component in place, touch the soldering iron to 1 of the corner pins so the solder flows onto the pad and pin.
- Check component alignment.
- Solder pin on opposite corner in the same way.
- Check component alignment again.
- Solder each pin individually, either by applying the very fine solder and iron to each pin, or by loading the iron with a bit of solder then touching each pin.
- If you end up with any solder bridges between pins, remove by dragging the iron tip between the pins or by using some very fine desoldering braid.
- Visually inspect the joints with a magnifying glass and remove shorts with desoldering braid if necessary.
Soldering fine pitch ICs (i.e. the rest of the SMT ICs)
- Apply plenty of flux to all pads.
- Position the component with tweezers and/or pointed implement.
- Load a very small amount of solder onto the soldering iron tip.
- While gently holding the component in place, touch the soldering iron to 1 of the corner pins so the solder flows onto the pad and pin.
- Check component alignment.
- Solder pin on opposite corner in the same way.
- Check component alignment again.
- Load a small amount of solder onto the soldering iron tip and drag steadily across the pins from one end to the other. The flux will cause the solder to flow onto the pins and pads and not to bridge.
- In case of not enough solder on joints, repeat the process across these joints.
- If you use too much solder you may end up with solder bridges between pins. These can be removed using some very fine desoldering braid, or just spread over to the pins with less solder by dragging the iron tip along the top of the pins.
- Visually inspect the joints with a magnifying glass and remove shorts with desoldering braid if necessary.
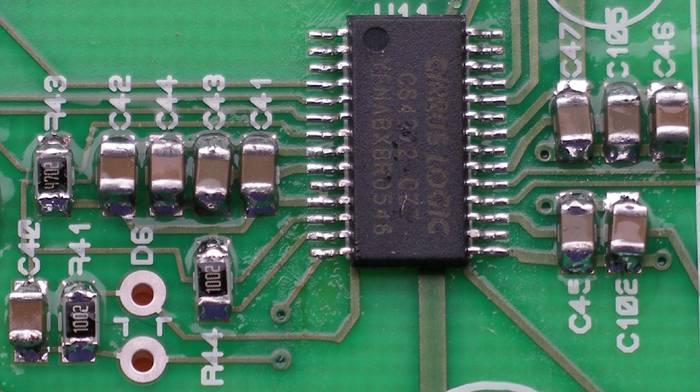
The results
This is a bit of the 4xD, my first SMT soldering project (other than the odd bit of repair work) and I was pretty happy with the results. It just goes to show that it's not as difficult or scary as one might think!
Further reading
A search on google will find a number of other surface mount soldering tutorials. Here are a couple:
http://dlharmon.com/solder/smd.html
http://www.bdmicro.com/smt/